Tag: vpn
-

killwarp
Is your company forcing Cloudflare Warp on you, and are you running on a Mac (with sudo access)? It probably sucks, spies on you, does MitM attacks, breaks most video conferencing tools, and is generally not very stable… Also… Zero trust! Add this function to your .bashrc or .zshrc (whichever shell you’re using*): Open a…
-

Remote desktop and Wake-on-LAN
Shan uses her iPad a lot, but a lot of the more serious (interior design) work needs to happen on AutoCAD or Photoshop. That is just not going to work on an iPad. When we’re travelling (read: holiday) she’s carrying an old Lenovo ThinkPad 13 (great device!) just “in case” she needs to open AutoCAD…
-
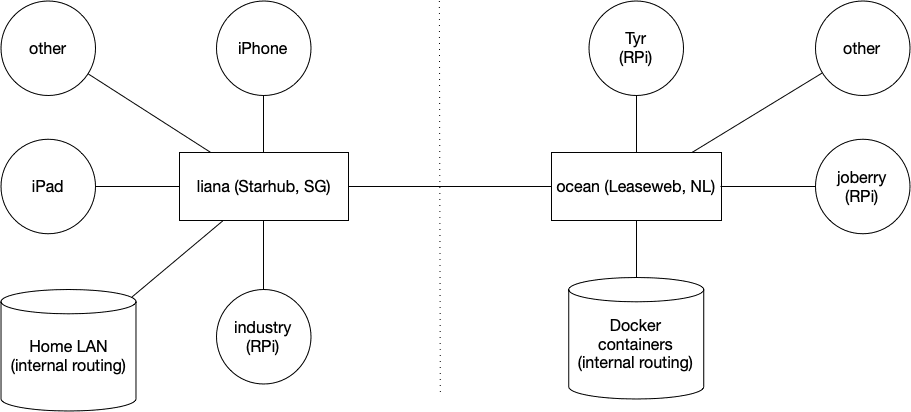
WireGuard
This is the first post of several. Next posts will focus on running WireGuard inside a Docker container on amd64 Linux and a Raspberry Pi. I’ve been running WireGuard for a few months now and I’ve been loving it. I first started using it about a year ago when in China — OpenVPN was once…
-
Box — Docker shell server
A couple of months ago I had the great idea to set up a shell server in Docker. Simply because my docker skillz were quite rusty and a shell server was something I actually genuinely needed. Shell servers… so 2005. I remember in the good old IRC days people asking for (free) shell servers to…
-
Edgerouter IPsec tunnel to Fritzbox
So, I have an EdgeRouter Lite in Singapore (Starhub) and a FritzBox in Belgium (EDPnet). This is mostly stuff that I have found from several articles, mostly from here. ERL: eth0 is WAN, eth1 (10.60.111.0/24) and eth2 (unused, not VPN’ed) are LAN FritzBoz: 192.168.1.0/24 This is the FritzBox config (go to VPN and them Import…
-
OpenVPN packet drops
I recently started to notice following error messages on my openVPN server. ovpn-server[6306]: vpn.rootspirit.com/85.234.x.y:62068 MULTI: packet dropped due to output saturation (multi_process_incoming_tun) This basically means that the TUN or TAP interface is making more packets than the real (TCP) interface can handle. As I need to run OpenVPN using the TCP protocol (instead of the…
-
OpenVPN & Windows 7
There’s a great GUI out for OpenVPN & Windows, located here. However, this GUI includes an old OpenVPN, that is no longer compatible with Windows 7 and Windows Vista. The TUN/TAP driver will be blocked due to compatibility issues, and when trying to connect to a VPN, you’ll get an error along the lines of:…
-
OpenVPN Linux + Mac howto
A short howto, as I was unable to find any clear ones on the net. I’m using Mac OS X (Leopard) as client, and a Gentoo server as server/host. I both tried Viscosity and Tunnelblick on my Mac as OpenVPN software, and Viscosity is probably somewhat easier to configure (using the GUI), it was shareware.…