Categories
Software www

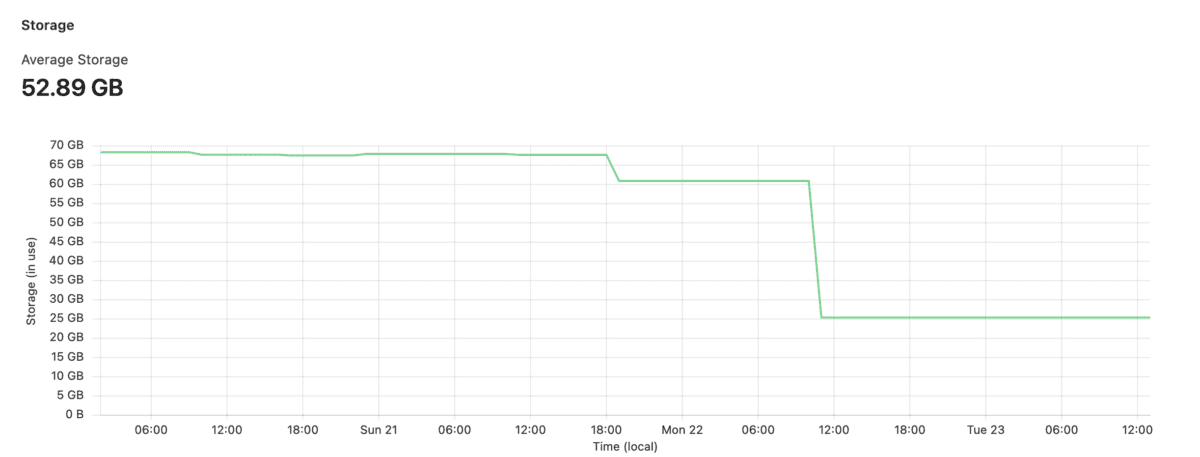
Keeping Mastodon storage in check

For my Mastodon instance, I use Cloudflare R2; mainly for two reasons:

  • Storage was growing quickly (~80Gb during its peak); I am hosting my instance on a RPi4 (w/ 8Gb RAM) and the SSD was filling up rapidly,
  • I wanted something speedy to serve (big and cacheable) content (i.e. a CDN).

While I didn’t care much about storage any more, I still wanted to make sure it was kept in check, also for two reasons:

  • Mastodon downloads a copy of all content it says on the Fediverse, and keeps it until purged. So every instance has all the content from other instances. This could theoretically lead to you hosting illegal content and getting in trouble for it,
  • Cloudflare used to be my employer, and I have free access to R2. However, there’s always a risk they’ll disable my employee benefits one day and get me to pay for my used storage.

I run my Mastodon in a Docker instance, so your commands may vary (basically tootctl X Y is what matters). I run most of these commands once a week using systemd (except the media remover, that runs every day).

This will clear:

  • accounts (you never interacted with)
  • header files (big picture every account can upload)
  • profile pictures
  • link preview cards
  • orphaned media (uploaded media but not posted)
  • media (from other accounts)
  • statuses (from other accounts)
  • and as a bonus include updating Elasticsearch indices (which sound run every once in a while to optimise search)
/usr/bin/docker compose -f /srv/mastodon/docker-compose.yml run --rm shell tootctl accounts prune

/usr/bin/docker compose -f /srv/mastodon/docker-compose.yml run --rm shell tootctl media remove --remove-headers --days 15

/usr/bin/docker compose -f /srv/mastodon/docker-compose.yml run --rm shell tootctl media remove--prune-profiles --days 30

/usr/bin/docker compose -f /srv/mastodon/docker-compose.yml run --rm shell tootctl preview_cards remove --days 15

/usr/bin/docker compose -f /srv/mastodon/docker-compose.yml run --rm shell tootctl media remove-orphans

/usr/bin/docker compose -f /srv/mastodon/docker-compose.yml run --rm shell tootctl media remove --days 30

/usr/bin/docker compose -f /srv/mastodon/docker-compose.yml run --rm shell tootctl statuses remove --days 30

/usr/bin/docker compose -f /srv/mastodon/docker-compose.yml run --rm shell tootctl search deploy

Note that you should play with the --days X to find something that works for you (i.e.: you can scroll back in the history and still see posts/media, but not overload your storage).

I’ve included all the systemd files that’s needed here. Again, will only work in a Docker environment using the same paths as me.

The systemd files will need to be activated using something similar to this (but again, don’t blindly run these commands as it’ll likely not work):

cp *.service *.timer /etc/systemd/system/
systemctl daemon-reload
systemctl enable --now *.timer
systemctl list-timers | grep masto

Oh, and this is not specific to R2. This works even when storing everything locally.

I’ve written before on how to use Cloudflare CDN to protect/speed up your instance.

Categories
Software www

Mastodon server: R2

This is a very short post because to be honest, I didn’t figure much out myself.

My uploads/static files are now saved in R2 under its own URL (part of my enterprise zone) so that my normal caching rules and other settings are applied.

Add these to your application.env file:

3_ENABLED = "true"
S3_BUCKET = "<bucket name>"
S3_ENDPOINT = "https://<some-id>.r2.cloudflarestorage.com"
S3_ALIAS_HOST = "<connected domain>" 
S3_PERMISSION = "private"
AWS_ACCESS_KEY_ID = "<access_key>"
AWS_SECRET_ACCESS_KEY = "<secret_access_key>"

The token/API key is a bit hard to find, but it’s on the top right.

Then (re)deploy your site.

I did set up a new server (my RPi4 started to struggle, and I guess if I'm half serious about Mastodon, I shouldn't host it at home), so I started afresh... But there's a way to migrate existing data to R2 as well, following this guide. 
Categories
Errors Software www

Using Mastodon with Cloudflare

If you’re using Mastodon with Cloudflare CDN/protection and minify turned on, you’ll notice the site may look broken (after a few visits, when hitting Cloudflare cache).

Yeah, that’s not how it’s supposed to look.

And you’ll notice errors in the webdev tools similar to Failed to find a valid digest in the 'integrity' attribute, with computed SHA-256 integrity:

Failed to find a valid digest in the 'integrity' attribute for resource 'https://mastodon.yeri.be/packs/js/common-997d98113e1e433a9a9f.js' with computed SHA-256 integrity 'YgEhHmwjKL88zKfUOMt/qRulYurIuHzhn4SZC9QQ5Mg='. The resource has been blocked.
@yeri:1 Failed to find a valid digest in the 'integrity' attribute for resource 'https://mastodon.yeri.be/packs/js/locale_en-f70344940a5a8f625e92.chunk.js' with computed SHA-256 integrity '1VgpQjY/9w/fgRLw1QH2pfzqr36p3hINvg9ahpBiI2U='. The resource has been blocked.
@yeri:1 Failed to find a valid digest in the 'integrity' attribute for resource 'https://mastodon.yeri.be/packs/js/public-a52a3460655116c9cf18.chunk.js' with computed SHA-256 integrity 'onh6vHxzykkVgJkiww+OCPk0tKC48KMUD9GVJ8/LKJQ='. The resource has been blocked.

Basically, the sha256 hash doesn’t match the js or css static files.

This happens because Cloudflare minifies those files and thus the hash has been changed.

To get it to work correctly, you’ll need to create a Page Rule via Rules > Page Rules > Create Page Rule with the following info:

The page rule created; in this screenshot, the rule is still turned off.
  • URL: YourMastodonURL.com/packs/*
  • Settings: Auto Minify: off (do not select anything)
  • Rocket Loader: slider off
Details on the page rule. Save and deploy.

Don’t forget to purge your cache via the dashboard (for the Mastodon domain) via Caching > Custom Purge > Hostname > YourMastodonURL.com.

Categories
Linux Software

Mastodon server: email

Always a hassle to get mail delivery to work.

Had a similar problem with a VoIP (Nexmo SMS/call forwarding) tool that just refused to work using local mail servers without a valid cert. Gave up and started using Mailgun. 

Long story short: use something like Mailgun or another provider.

Using localhost SMTP server support seems to be limited if you don’t have working certs. The documentation is also lacking as to what does what. Didn’t figure out how to have it ignore SSL.

This is what worked for me, using Mailgun server:

SMTP_SERVER=smtp.eu.mailgun.org
SMTP_PORT=465
[email protected]
SMTP_PASSWORD=some-password
[email protected]
SMTP_DELIVERY_METHOD=smtp
SMTP_SSL=true
SMTP_ENABLE_STARTTLS_AUTO=false
SMTP_AUTH_METHOD=plain
SMTP_OPENSSL_VERIFY_MODE=none

And it looks like I’m not the only one struggling.

Categories
Linux Software Virtualisation

Feed2Toot

Started looking into a service to auto-post from this blog onto my Mastodon feed. Feed2Toot fit the bill perfectly.

I wanted to run the whole thing from a Docker container, though, so I’ll quickly write a how-to.

This whole thing runs from a Raspberry Pi, as root. No k8s or k3s for me. The path I use is /root/git/feed2toot/, so be sure to modify that to whatever you’re using.

First off, get your credentials for the app. You can either install the Feed2Toot package on a system (i.e. throwaway VM, to keep it clean), or use the Docker container below, but add RUN apk add bash and change the last line to CMD ["bash"] and then chroot into it via docker exec -it feed2toot bash.

This will generate two files (feed2toot_clientcred.txt and feed2toot_usercred.txt). Be sure to save these.

You can also try to run Feed2Toot at least once to make sure it’s working and to fine-tune your ini file. This is mine:

[mastodon]
instance_url=https://mastodon.yeri.be
; Here you need the two files created by register_feed2toot_app
user_credentials=/etc/feed2toot/feed2toot_usercred.txt
client_credentials=/etc/feed2toot/feed2toot_clientcred.txt
; Default visibility is public, but you can override it:
; toot_visibility=unlisted

[cache]
cachefile=/feed2toot/feed2toot.db
cache_limit=10000

[lock]
lock_file=/var/lock/feed2toot.lock
lock_timeout=3600

[rss]
uri=https://yeri.be/feed
; uri_list=/feed2toot/rsslist.txt
toot={title} {link}
; toot_max_len=500
title_pattern=Open Source
title_pattern_case_sensitive=true
no_uri_pattern_no_global_pattern=true
; ignore_ssl=false

[hashtaglist]
; several_words_hashtags_list=/feed2toot/hashtags.txt
; no_tags_in_toot=false

[feedparser]
; accept_bozo_exceptions=true

[media]
; custom=/var/lib/feed2toot/media/logo.png

I have three other files to make this work, first off Dockerfile:

FROM python:3.6-alpine
RUN pip3 install feed2toot && mkdir -p /etc/feed2toot/
COPY feed2toot.ini feed2toot_clientcred.txt feed2toot_usercred.txt /etc/feed2toot/
VOLUME /feed2toot/
CMD ["feed2toot", "-c", "/etc/feed2toot/feed2toot.ini"]

The script I run to build the container (start.sh):

#!/bin/bash
git pull

BASEIMAGE=`cat Dockerfile | grep FROM | awk '{print $2}'`
docker pull $BASEIMAGE
docker stop feed2toot
docker rm feed2toot
docker build -t feed2toot .
./run.sh

And finally, the script to run the container every so often (run.sh):

#!/bin/bash
docker run -d --rm -v /srv/mastodon/feed2toot/:/feed2toot/ --name feed2toot feed2toot

This will save the database file under /srv/mastodon/, to preserve states across rebuilds.

Note that once Feed2Toot runs, it’ll exit, and the container will be stopped. So it does not automatically run all the time.

So, you’ll want to run this every so often. You can add a file to /etc/cron.d/ to run it, for example, every six hours:

#
# cron-jobs for feed2toot
#

MAILTO=root

0 */6 * * *		root	if [ -x /root/git/feed2toot/run.sh ]; then /root/git/feed2toot/run.sh >/dev/null; fi

That’s it. Should do the trick. It’ll now post stuff from your RSS feed onto your timeline.

Oh, and Jeroen has a good post about Mastodon.