Categories
Hardware Linux Software

Raspberry Pi 4 + SSD

All right. With the release of the new RPi4 with 8Gb of RAM I had to get myself one to see if it was already a viable desktop replacement for surfing and emails.

While a SD card works fine for certain tasks (things that don’t require a lot of IO) — for a desktop that’s a no-go… It’s just too slow.

I still had an old Macbook Pro 13″ (2o15?) SSD lying around that was collecting dust. Why not use that one to use as root for the RPi?

This article will focus on making it work on Raspbian first. Technically this should all work on other distros as well, but YMMV seeing all this is still beta.

I use Raspbian Lite: I like to work with minimalstic systems and install just what I need. But technically this should work with any flavour.

But first, let’s prep the device.

Case

I already have a RPi4 (4Gb) at home running mostly Docker containers (nginx proxy and a few personal things and Smokeping).

And one of the ‘best’ purchases I made for the RPi4 was the “Raspberry Pi 4 Model B Aluminium Case” (Lazada, AliExpress). This case is passive and dissipates enough heat (even in a closed cabinet in Singapore where it’s 30°) for the CPU never to throttle back when overclocked at 2Ghz (see below).

Do note that this case (which is pretty much just a massive heat sink) gets pretty hot if the RPi is running at max performance for long periods of time.

USB-SSD

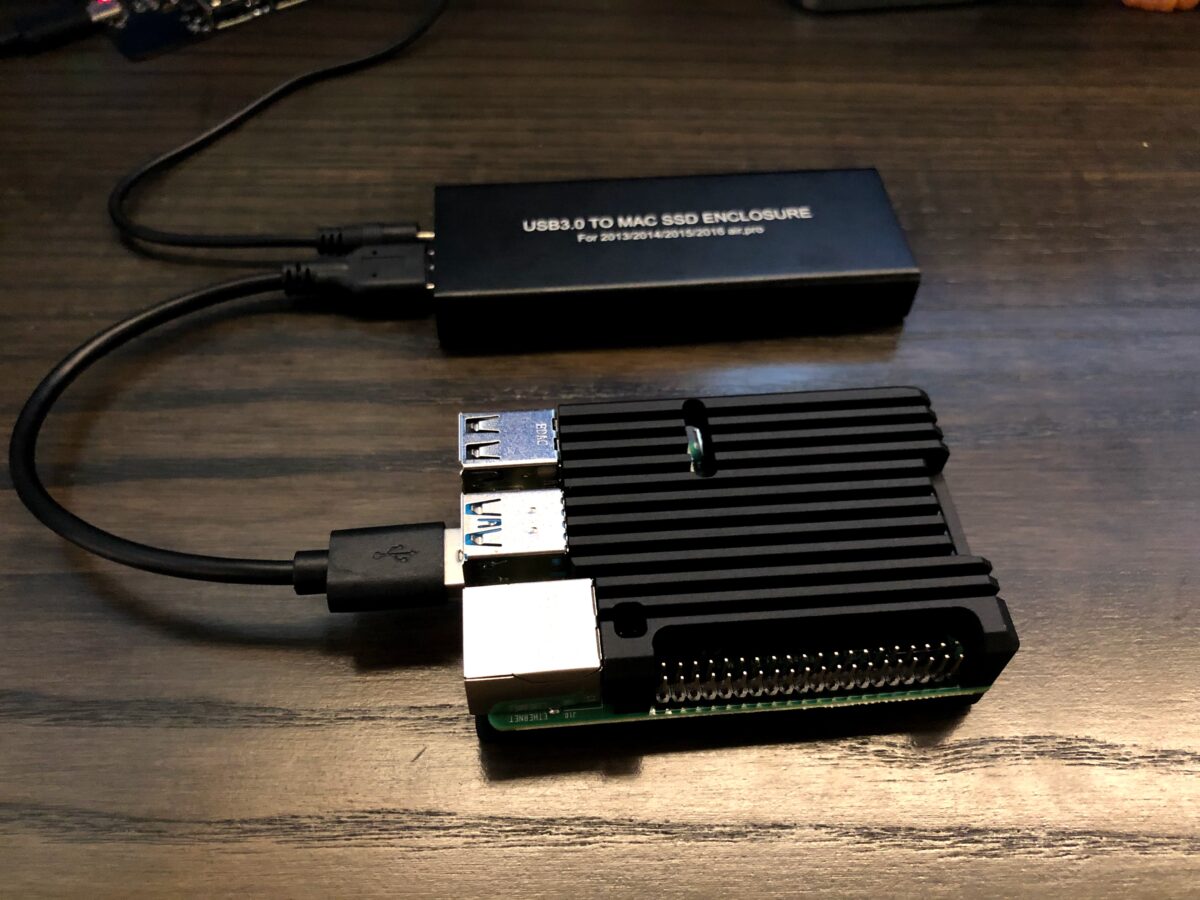
Get one that fits your SSD and that ideally has Linux support. As Apple uses custom SSD connectors (prior to being soldered onto the motherboard) I had to get a converter from China. It was a bit of Russian Roulette to see if it would work or be supported on Linux. I got myself this one (chipset: Netchip Technology). As I didn’t remember what type of Macbook Pro this came from, using this site to compare serial/model was useful. This USB-to-SSD converted also works on Mac and Windows by the way.

The SSD with the PCB that provides the USB interface.

In my case, the RPi also did not provider enough power to the USB-SSD converter (although… it really should but whatevs), so be sure to use the provided power cable and plug it into a USB power source. Not doing so will cause the SSD to heat up and show a bunch of disconnects/errors in dmesg.

raspbian ~ # fdisk -l /dev/sda1 
Disk /dev/sda1: 233.8 GiB, 250999127552 bytes, 490232671 sectors
Units: sectors of 1 * 512 = 512 bytes
Sector size (logical/physical): 512 bytes / 512 bytes
I/O size (minimum/optimal): 512 bytes / 512 bytes
raspbian ~ # lsusb 
Bus 002 Device 002: ID 0525:622b Netchip Technology, Inc. 
Bus 002 Device 001: ID 1d6b:0003 Linux Foundation 3.0 root hub
Bus 001 Device 002: ID 2109:3431 VIA Labs, Inc. Hub
Bus 001 Device 001: ID 1d6b:0002 Linux Foundation 2.0 root hub
raspbian ~ # lsusb -t
/:  Bus 02.Port 1: Dev 1, Class=root_hub, Driver=xhci_hcd/4p, 5000M
    |__ Port 2: Dev 2, If 0, Class=Mass Storage, Driver=usb-storage, 5000M
/:  Bus 01.Port 1: Dev 1, Class=root_hub, Driver=xhci_hcd/1p, 480M
    |__ Port 1: Dev 2, If 0, Class=Hub, Driver=hub/4p, 480M
Raspberry Pi 4 with USB SSD connected

eeprom update

Disconnect the USB-SSD for now.

At the time of writing we need to update the eeprom to boot from USB. I’m using the latest eeprom available to me. Note that the USB-boot eeprom is about to hit stable so you might not need to do this anymore.

There are two methods for updating. We can do it manually:

rpi-update
cd /lib/firmware/raspberrypi/bootloader/beta
rpi-eeprom-update -d -f ./pieeprom-2020-06-15.bin
# BCM2711 detected
# VL805 firmware in bootloader EEPROM
# BOOTFS /boot
# *** INSTALLING ./pieeprom-2020-06-15.bin ***
# BOOTFS /boot
# EEPROM update pending. Please reboot to apply the update.
reboot
# RPi should come back online after a reboot

Or we use rpi-eeprom-update (see article, at the bottom):

nano -w /etc/default/rpi-eeprom-update
# edit critical to stable
rpi-eeprom-update
rpi-eeprom-update -a

The good thing is that, even if you boot from a Raspbian that does not have /etc/default/rpi-eeprom-update edited to use stable instead of critical, it will not downgrade your eeprom.

Now you can plug in the SD card in an USB-SD card reader, and test if the RPi boots from USB. Note that the SD card might be slower.

RPi booting the SD card from USB (/dev/sda)

All right — so everything is working. I am keeping this SD card to update the eeprom again at a later stage (as the one we flashed is beta). If we use Archlinux or Ubuntu the eeprom update tools won’t be included.

Next step is to flash Raspbian to the USB-SSD.

This screenshot shows Ubuntu, but for the sake of this article, we’ll use Raspbian still. I’m using Etcher to flash.

Boot-up from the USB-SSD.

Errors

In case you are getting an error similar to start4.elf: is not compatible you’ll need to copy paste /boot/start4.elf from a Raspbian that ran rpi-update (i.e. the one from the SD card, or see below).

If you are booting (a fresh) Raspbian, it might complain about cma: Failed to reserve 256 MiB (and several other errors). The solution is running rpi-update.

Boot from the working Raspbian (using the SD card):

# check which drive is your USB-SSD (i.e. using fdisk -l or dmesg). 
# In my case I booted from USB-SD (/dev/sda) and we'll update the new/clean Raspbian on the SSD (/dev/sdb).
#
# First resize the partition, if the system never booted it'll be 1.5Gb and thus not big enough:
# Device     Boot  Start     End Sectors  Size Id Type
# /dev/sdb1         8192  532479  524288  256M  c W95 FAT32 (LBA)
# /dev/sdb2       532480 3620863 3088384  1.5G 83 Linux
fdisk /dev/sdb
# Type the following:
# p (and visually check it all makes sense)
# d
# 2
# n
# Select (default p): p
# Partition number (2-4, default 2): <enter>
# First sector (2048-490234751, default 2048): 532480 (or whichever is the same "start" from the 2nd partition) 
# Last sector, +/-sectors or +/-size{K,M,G,T,P} (532480-490234751, default 490234751): <enter>
# Created a new partition 2 of type 'Linux' and of size 233.5 GiB.
# Partition #2 contains a ext4 signature.
# Do you want to remove the signature? [Y]es/[N]o: n
# p (visually check once again it makes sense, if not you can cancel/quit by typing q)
# w (if it makes sense)
# The last command will write the changes to the partition table and sync all changes. 
# Then we need to check and resize the filesystem:
e2fsck -f /dev/sdb2
resize2fs /dev/sdb2
# If all that worked we can start mounting everything
mkdir /tmp/ssd
mount /dev/sdb2 /tmp/ssd/
mount /dev/sdb1 /tmp/ssd/boot/
mount /proc/ /tmp/ssd/proc/ -t proc
mount --rbind /sys/ /tmp/ssd/sys/
mount --rbind /dev/ /tmp/ssd/dev/
# Once everything is mounted, we're chrooting into the fresh Raspbian running on the SSD
chroot /tmp/ssd/ /bin/bash
# you can double confirm the partition size using:
df -h
# And we update the system. Again, if all this hits stable it might not be needed.
rpi-update
# say "y" when it's asking you to.
# exit the chroot and turn off the device, remove the USB-SD and leave USB-SSD connected. 
exit 
halt

My first reboot the boot process threw errors about failing to mount the root fs.

We’ll need to update /etc/fstab with the correct partuuid.

# Boot from the (USB-)SD card again
# In my case sdb became sda and vice versa, so double check
lsblk
# be sure to select the right disk (the SSD, no the SD)!
mkdir /tmp/ssd
mount /dev/sda2 /tmp/ssd/
# And find the SSD here as well.
# look for the last column, partuuid, something like 
"6f6cc2fb-01"
blkid
nano -w /tmp/ssd/etc/fstab
# edit the existing partuuid's with the ones from blkid
# you'll need to edit both /boot (-01) and / (root, -02).
halt
# When rebooting from the SSD it'll go through a fsck. In my case for some reason it failed and dropped to a shell. I did a manual check and everything was fine. Rebooted and it booted normally... *shrug*

Booting

At this stage booting from the USB-SSD should work just fine. You have a working system booting from USB.

It’s working! Now I can configure my system.

Overclocking

Last thing I’d recommend is getting a bit more juice out of your four cores.

You can quite easily overclock the RPi4 to 2Ghz (per core). It’s a pretty nice boost (~25%) and worth going for. I haven’t seen any heat issues leading to underclocking (throttling back), and everything runs stable. Note that under real circumstances you are unlikely to be running at 100% for extended period of times.

This guide explains how to overclock Raspbian (but the same applies for Ubuntu RPi — I’ll eventually be using Ubuntu as the OS due to its 64 bit support; at the moment Raspbian only supports a 64 bit kernel (beta) and the userland still runs 32 bit. But that’ll be a follow-up article.

The gist of the article is to edit /boot/config.txt and add:

over_voltage=6
arm_freq=2000

Save the file, reboot and monitor temp (echo $((cat /sys/class/thermal/thermal_zone0/temp/1000))) and core frequency (watch -n 1 vcgencmd measure_clock arm) while running stress -c 4 to make sure the cores are running at 100%.

Raspberry Pi 4 running at 2Ghz
Raspberry Pi 4 running at 2Ghz. It never throttled back after running for ~30 minutes.
Categories
Apple Hardware Software

Mounting a RAMFS disk at boot in Mac OS X

I received a question about creating a RAMFS for Mac OS X’ /tmp folder, so I’ll post my reply here as well.

It’s really simple;

  1. Open Terminal (Applications -> Utilities), type “sudo su” and enter your user’s password.
  2. Create a new file in /Library/LaunchDaemons, like this: “nano -w /Library/LaunchDaemons/com.yeri.ramfs.plist” (you can rename yeri to whatever you like)
  3. And insert following content (ctrl+x to save – y – [enter]):
  4. <?xml version="1.0" encoding="UTF-8"?>
    <!DOCTYPE plist PUBLIC "-//Apple//DTD PLIST 1.0//EN" 
    "http://www.apple.com/DTDs/PropertyList-1.0.dtd">
    <plist version="1.0">
        <dict>
            <key>Label</key>
            <string>com.yeri.ramfs</string>
            <key>ProgramArguments</key>
            <array>
                <string>/var/root/ramfs.sh</string>
            </array>
            <key>RunAtLoad</key>
            <true/>
        </dict>
    </plist>
  5. create a second file in /var/root/, like this: “nano -w /var/root/ramfs.sh
  6. And insert following content:
  7. #!/bin/bash
    ramfs_size_mb=64
    mount_point=/private/tmp
    
    ramfs_size_sectors=$((${ramfs_size_mb}*1024*1024/512))
    ramdisk_dev=`hdid -nomount ram://${ramfs_size_sectors}`
    newfs_hfs -v 'Volatile HD' ${ramdisk_dev}
    mkdir -p ${mount_point}
    mount -o noatime -t hfs ${ramdisk_dev} ${mount_point}
    chown root:wheel ${mount_point}
    chmod 1777 ${mount_point}
  8. chmod +x ramfs.sh and reboot. Check in Terminal with “mount” or “df -h” is everything is fine. To hide the disk icon on your desktop, check my old blog post.
  9. In case Mac didn’t do so already, you might want to link /tmp to /private/tmp: “rm -r /tmp && ln -s /private/tmp /tmp“.
  10. Should be it !
Categories
Apple Hardware Software

Mac OS X + SSD tweaks

Came across a pretty cool howto to tweak your SSD on a Mac. Only thing I noticed is setting the hibernate mode to 0 made my mac randomly wake up a few seconds after it went to sleep (and happened most often when closing the lid, less often when clicking the sleep button; randomly closing apps seemed to sometimes fix this problem; usually closing Skype and VLC solved this…) Set it the hibernate mode 7 now (which was the default I think)

yeri$ sudo pmset -g | grep hibernatemode
hibernatemode   7
yeri$ mount
/dev/disk0s2 on / (hfs, local, journaled, noatime)
...
/dev/disk2     256Mi  6.0Mi  250Mi     3%    /private/tmp

I did indeed, as noted in the above howto/blog post, that shutting down is slower. Not that much, just a bit. As I usually don’t shut down, I guess this isn’t much of a problem. However, this additional mount point creates a disk on my desktop (or in finder), which is annoying.

However, this seems fixable with

/Developer/Tools/SetFile -a V /private/tmp/

But, this option seems forgotten after a reboot and has to be started over. Crappy.

So, tried with AppleScript then, created a new script with following content:

quit application "Finder"
tell application "System Events" to ¬
set visible of disk "Volatile HD" to false
delay 0.1
launch application "Finder"

And saved it as “File Format: Application” and “Options: Run Only”. The delay line is needed, as without it, finder doesn’t seem to start/reopen its folders/show desktop icons until  you click its icon again in the Dock. You can change the delay to 1, but that was a bit slow for me; tried a delay of 0.0001 too, but that gave the same issue as not putting in a delay line in at all.

You can just download the script/application here.

Drag the application to the Application folder, and add a start up item for it (System Preferences -> Accounts -> YOU -> Login Items; click the +-button and browse till you find your application). Should do the trick.

I also changed the ramfs disk size to 128Mb instead of 256Mb, as 256Mb seemed a lot for a disk that was using ~10Mb.